Tuesday, January 31, 2012

NOTD: Aquadelic

Today I decided to test out my China Glaze nail polish that came in my January 2012 Luxe box.  

What I used:
Used in order shown above from left to right
-OPI; Nail Envy (clear base coat)
-China Glaze; in 'Aquadelic' (turquoise)
-Seche Vite; Dry Fast Top Coat (clear top coat)

This nail polish is a little bit thick, but applies nice and smooth.  I only needed to use two coats to get a good opaque coverage.

After 2 coats of 'Aquadelic'

As soon as I saw this polish in my Luxe Box I was bummed.  I thought it was 'For Audrey' (Not that that is a bad colour, but I already own two bottles of it).  When I saw that it was a different colour I immediately pulled out my 'For Audrey' nail polish to do a comparison.  

Both China Glaze; Left: For Audrey, Right: Aquadelic
'For Audrey' is more of a muted turquoise, with a bit more of a mauve colour to it.  Where as 'Aquadelic' is a bright turquoise, more of an aqua colour (which makes sense seeing as the name of this polish does have 'aqua' in it!)

What colour nail are you sporting today?

-Gabby


How to: Remove Glitter Nail Polish

Glitter nail polish always seems like a good idea until it comes time to remove it.  Luckily there is an easier way.  
before: Nail with glitter polish

What you will need:
-Nail Polish Remover
-Cotton Ball/Pads
-Tinfoil

1. Pre-cut your cotton pads in half so that you don't use too many [You will need 10 pieces in total, one for each finger].  
2. Pre-cut your tinfoil as well.  I like to cut mine in pieces about 2" by 2".
3. Soak your cotton pad in nail polish remover and press it onto your nail.
4. Immediately after tightly wrap your nail in the tinfoil.  The tinfoil will prevent the polish remover from drying and will allow it to soak against the nail polish.
5. Wait about 5-10 minutes before removing the cotton pad & tinfoil.  Make sure to press firmly against the nail when removing it, and slightly wiggle it up.
6.  Enjoy your perfectly clean nails!  
-note: I do not suggest that you do this everyday as it can be quite drying on your cuticle and nail.  After removing the polish wash your hands and apply your favourite hand cream.

Cotton pad soaked in polish remover.
What it looks like.
Tinfoil + cotton pads post removal
after: clean nail with no polish or glitter

So now that there is an easier way to remove your glitter polish, will this be a nail that you chose to rock more?


-Gabby


Sunday, January 29, 2012

NOTD - Follow me on Glitter

Today I opted for a Black with glitter nail polish look.  Achieving this look was super easy, other than the base and top coat 1 polish was used. 


What I used:


Used in order shown above from left to right
-OPI; Nail Envy (clear base coat)
-Nicole by OPI; Kardashian Kolor in 'Follow me on Glitter' ( black w/glitter nail polish)
-Seche Vite; Dry Fast Top Coat (clear top coat)

Most glitter nail polishes tend to apply quite sheer and need another nail polish colour layered underneath to really show up nicely on the nail.  But not 'Follow me on Glitter" from the Kardashian Kolor Nicole by OPI nail polish.  It only took 2 coats to cover my nail perfectly.

after 2 coats of 'Follow me on Glitter'

Keep in mind, as this is an opaque glitter polish the formula is a bit thicker than most nail polishes.

This is the brush pulled out directly from the bottle, not wiped off first.
Have you checked out the Kardashian Kolor nail polishes?  If so what colour (if any) has caught your eye from the collection? 

-Gabby


Friday, January 27, 2012

January 2012 - Luxe Box

That's right my Luxe Box has finally arrived.  Better late then never right?
(I had originally expected to receive my Luxe Box at the same time I got my Glymm Box.  Unfortunately Luxe Box was unable to send out their boxes until this week, but thankfully they did send out an e-mail giving its many subscribers a heads up and an explanation.)


I had received an e-mail late in the evening yesterday saying that my box had been shipped out via "Xpresspost", so I knew that I would be coming home to it today.  Unlike the Glymm Box in its amazing bubble gum pink shipping box, Luxe Box ships to you in your run of the mill, brown shipping box.


Shipment Box
Despite the boring shipping box (I was told never to judge a book by its cover anyways) I was still super excited to get this box open.  Right when the box was open I was presented with another surprise.  Instead of 1 box I was greeted by 2!

Top: Standard Luxe Box.  Bottom: Complimentary Bath and Body Box
I'll start with the standard Luxe Box (black box) first.


Whats inside
Inside January 2012's Luxe Box:
-China Glaze; Nail Polish in 'Aquadelic' [FULL SIZE!] (Full Size: 14 mL / $8.00)
-Yves Rocher; 24H Vitality Anti-Fatigue Skin Care (Full Size: 50 mL / $52.00)
-Loose Button (Multiple Brands); Perfume Samples [see below for each samples details.] 
-NYX; Jumbo Eye Pencil in 'Iced Mocha' [FULL SIZE!] (Full Size: 5 g / $5.00)
-Seattle's Best Coffee (Bonus); Level 3 (Full Size: 340 g / $9.99)

For those of you who have not heard about Luxe box it has the same concept of the Glymm Box; a monthly subscription of 3-5 deluxe beauty samples that are sent directly to your door for $12!! (Glymm Box is $10/month)


Here are some pictures of items that came in this months box:
turquoise blue nail polish
Intensive face moisturizer
 6 Perfume Samples 
-Prada; Candy (Full Size: 50 mL / $96.00)
-Prada; Infusion D'iris (Full Size: 50 mL / $95.00)
-Nina Ricci; L'Aire du Temps (Full Size: 50 mL / $72.00)
-Nina Ricci; Nina (Full Size: 50 mL / $65.00)
-Paco Rabanne; Black XS for her (Full Size: 50 mL / $65.00)
-Paco Rabanne; Lady Million (Full Size: 50 mL / $80.00) 
Gold Jumbo Eye Pencil
Ground Coffee Beans
And now onto the Bath and Body Luxe Box (white box):

Whats inside
Inside January 2012's Bath and Body Luxe Box:
-Shick; Hydro Silk - 5 Blades [FULL SIZE!] (Full Size: 1 Razor / $13.99)
-Fekkai; Advance Brilliant Glossing shampoo and conditioner (Full Size: 8 oz / $25.00 Each.)

Other than coming late I was quite happy with my first Luxe box.

If you have subscribed to Loose Button's Luxe Box what items did you receive this month?

-Gabby


Thursday, January 26, 2012

NOTD - Teal & Black Ombre Nails

Everyone knows that Ombre is a trend that doesn't seem to be going away anytime soon - And that's OK with me!

A couple of months ago I saw a youtube video on how to accomplish your own Ombre nails.  At the time I never bothered to try it, out of fear of disappointment.  But than a couple of weeks ago my sister posted a facebook picture of beautiful Red & Black Ombre nails that she did and I knew I had to give it a go.

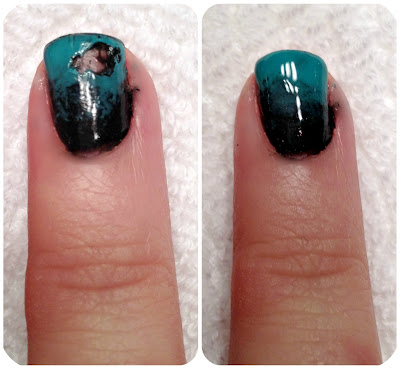
I opted for teal and black nails.

Keep in mind in person it fades much nicer.
What I used:
Used in order shown above from left to right.
-OPI; Nail Envy (clear base coat)
-Sally Hansen; Complete Salon Manicure in '670 - Midnight in NY' (1st colour - black nail polish)
-L.A. Girl; Disco Brites, black light nail polish in 'Turntable' (2nd colour - teal nail polish)
-Seche Vite; Dry Fast Top Coat (clear top coat)
-(Pictured below) Makeup sponge, & A clear lid.


1:  Prep your nails using your favourite base coat.
2:  Apply two coats of a base colour of your choice.  I chose a black with a slight shimmer to it.
3: Take a makeup sponge and rip off two small pieces.  (One will be to dab on your second colour, the other will be to dab off some nail polish if too much is applied.  Also used to help fade the bottom)
4: [I used a clear plastic lid for this step] Take your second colour of choice -I used teal- and pour a small amount onto a hard surface that can be stained (i.e. Plastic container lid, paper/plastic plate, glass coaster, etc)
5: Take your ripped makeup sponge (Make sure to use the ripped side) and dab it into your second colour.  Begin to dab this colour lightly onto your nails - starting about mid-way.  As you get closer to the tip of your nail, dab more color on, making the very tip of your nail opaque with the color you chose. 
6:  If you applied to much color at the bottom of the nail, take the second piece or ripped sponge and dab it on your nail.  The clean sponge should remove some of the second color that you have over applied.
7:  Go over your nails with a top coat to smooth the nail polish and give your nails a nice shine.  I choose Seche Vite as it is a very quick drying top coat.
8.  Enjoy your new Ombre Nails!!

thumbs up for Ombre nails!
And if anyone is as impatient as I am when they paint their nails, not to worry.  All you have to do is dab some more of the color over the spot that you smudged, and reapply a top coat.

I used the actual nail polish brush to re-apply the colour since it was on an opaque spot,
but if yours happens further down all you have to do is re-apply the base colour, and then stamp on the secondary colour.
See, good as new! - Lol.

Will you be trying the Ombre nail?  If not what is your favourite style of nail polish?

-Gabby


Wednesday, January 18, 2012

Kaia Naturals; Juicy Bamboo Facial Cleansing Cloths

Juicy bamboo facial cleansing cloths, by Kaia Naturals was one of the 5 products that came inside of my January 2012 Glymm Box. 


 I figured today would be the perfect day to test out this wipe as I was wearing enough makeup to justify a good makeup removal but not an excessive amount.  It would be unfair to test out a full face of makeup on a single wipe, as I would not expect my favourite makeup removers to do the job in one shot either.


When it comes to makeup wipes I find that they are perfect for a quick removal when you don't have the time or the resources to properly cleanse your face.  


As convenient as they are, I have always hated them for removing my mascara.  I tend to put a little makeup remover on my wipe to help me out, or I'll just leave the mascara on until I am able to properly remove it.  When I was reading the back of the post card that comes with the wipe, this statement definitely stood out to me:


Even after reading that I was still skeptical to use it on my eyelashes, but I still gave it a go.  I have to say as far as wipes go, this one has exceeded my expectations.  One single wipe was able to remove all of my makeup -- Mascara included!  I went over my face after with a M.A.C wipe to see if there was still any makeup left but the wipe came out clean.
Front of wipe
Back of wipe
 This is definitly something that I will be purchasing the full size of for late nights and times that I am going away and do not want to bring my whole cleansing kit.

Oh and did I mention that they are Cruilty free?


If you are interested in purchasing these wipes you can find them online at http://www.kaianaturals.com the website also has a store locator if you prefer to find a store near you to buy them.

Have you ever tried these makeup wipes, if not what is your favourite makeup wipe to use?

-Gabby


Monday, January 16, 2012

January 2012 - Glymm Box

It's finally here!!
My January 2012, and first Glymm Box has arrived.  I signed up late December for both the Luxe Box and the Glymm Box, and I am excited that one of them has finally arrived.  I received an e-mail on Friday saying that I should expect my Glymm box on January 20th, so I was pleasantly surprised when I came home today to see the most beautiful bubble-gum pink shipping box sitting on my counter. 

Shipment Box
Whats inside
Inside January 2012's Glymm Box:
-Kaia Naturals; Juicy Bamboo Facial Cleansing Cloths (Full Size: 30 Cloths / $17.99)
-Vasanti Cosmetics; BrightenUp! Enzymatic Face Rejuvenator (Full Size: 120 mL / $34.00)
-Anastasia Beverly Hills; Clear Brow Gel (Full Size: 0.28 oz / $21.00)
-Burt's Bees; Nourishing Milk & Honey Body Lotion (Full Size: 170 g / $12.99)
-Cargo Cosmetics; Eye Pencil [FULL SIZE!] (Full Size: 2 g / $16.00)


For those of you who have not heard about Glymm box it is a monthly subscription of 3-5 deluxe beauty samples that are sent directly to your door for just $10 a month!!


This month the full size Cargo pencil (at $16) alone pays for this box. 

Top: Solid Line, Bottom: Smudged

And here are some pictures of the rest of this months box:
1 Individually Wrapped Facial Cleansing Cloth
Exfoliating Cleanser
Clear Brow Gel
Body Lotion.
 So far other than the quick swatch of the Cargo Eye Pencil, all I have tried out is the Anastasia Beverly Hills - Clear Brow Gel.  The brow gel worked at keeping my brows tamed, but it almost felt as though I had coated my brows in hairspray.  I will try using this product again as it did do a great job at keeping my eye brows inline, hopefully with a lighter application it will feel more natural.


So tell me, have you signed up for the Glymm box?  If so what product did you like best in this months box?


-Gabby